lunes, 20 de enero de 2020

Dynamics 365 - Create tests for 2 different CRMs

This entry is like Dynamics 365 - Install and configure EasyRepro with the difference that you will create two TestBase files reading different keys from app.config. All tests will inherit from one or another TestBase, depending in which namespace are located will point to one or another CRM.

This entry assumes that you have or at least you created a trial for Dynamics 365 CRM and signed in.
You can create a trial here: https://port.crm.dynamics.com/G/TrialInstances/TrialInstancePicker.aspx

You need to be System Administrator and System Customizer.
http://josevibriezca.blogspot.com/2020/01/promote-to-admin.html
http://josevibriezca.blogspot.com/2020/01/add-system-customizer-role.html

  1. Create a project of type Visual C# / Web / ASP.NET Web Application (.NET Framework)".
  2. Select template MVC for the project.
  3. Check "Add unit tests" checkbox.
  4. Open the App.config file located in the test project.
  5. In configuration / appSettings paste the following keys (replace the values with your own credentials).
    <add key="OnlineUsername_A" value="name@name.onmicrosoft.com" />
    <add key="OnlinePassword_A" value="*********" />
    <add key="OnlineCrmUrl_A" value="https://testcrmA.crm.dynamics.com/" />
    <!--.-->
    <add key="OnlineUsername_B" value="name@name.onmicrosoft.com" />
    <add key="OnlinePassword_B" value="*********" />
    <add key="OnlineCrmUrl_B" value="https://testcrmB.crm.dynamics.com/" />
    <!--.-->
    <add key="BrowserType" value="Chrome" />
    <add key="RemoteBrowserType" value="Chrome" />
    <add key="RemoteHubServer" value="http://1.1.1.1:4444/wd/hub" />
  6. Right click the test project and select "Manage NuGet Packages...".
  7. Install "Dynamics365.UIAutomation.Api" and "Selenium.Chrome.WebDriver".
  8. Right click your test project and select Add / New Folder. Name it "CRM_A" (or any name relevant to you).
  9. Download and add to the project (to the new folder CRM_A) the last version of the class TestBase from https://github.com/microsoft/EasyRepro/blob/develop/Microsoft.Dynamics365.UIAutomation.Sample/Web/Entity/TestBase.cs.
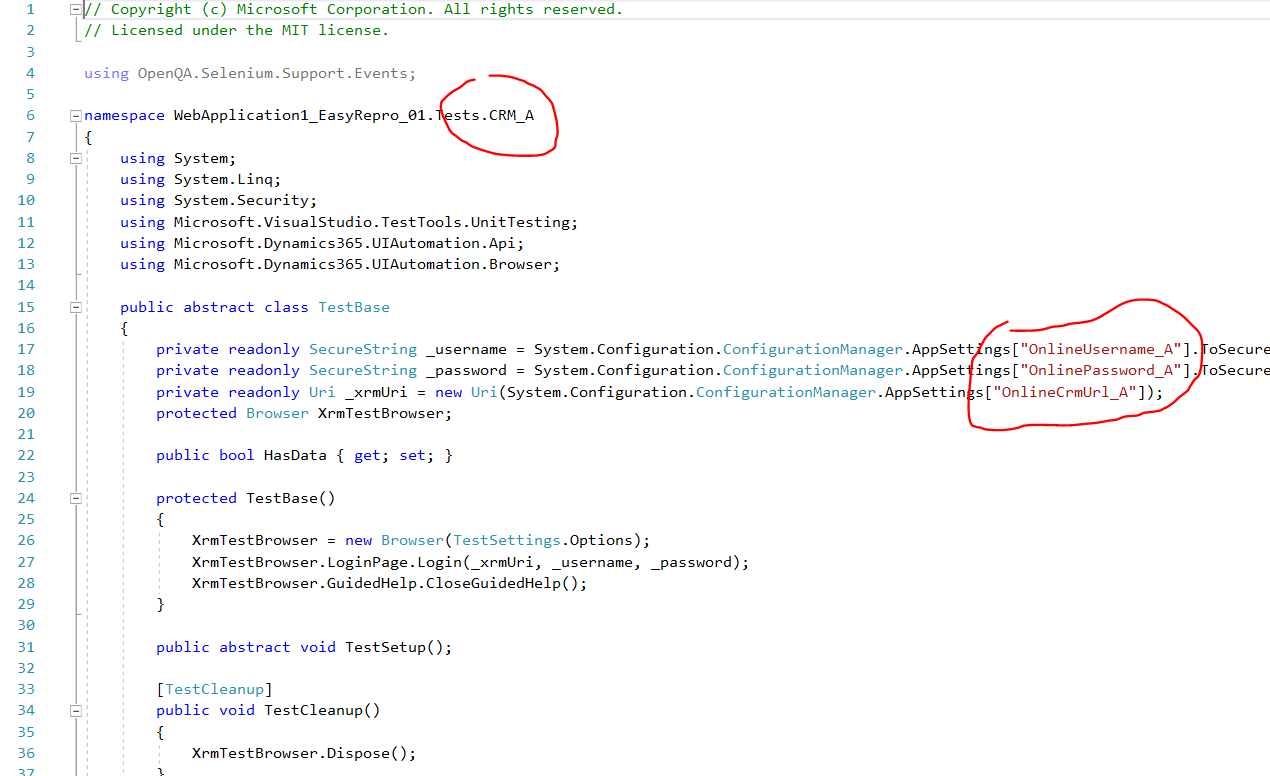
  10. Replace the namespace "namespace Microsoft.Dynamics365.UIAutomation.Sample.Web" with your own namespace, example "WebApplication1_EasyRepro_01.Tests.CRM_A". Make sure to end the namespace with the name of the new folder.
  11. Replace the strings "OnlineUsername", "OnlinePassword" and "OnlineCrmUrl" with "OnlineUsername_A", "OnlinePassword_A" and "OnlineCrmUrl_A" for the variables _username, _password and _xrmUri.
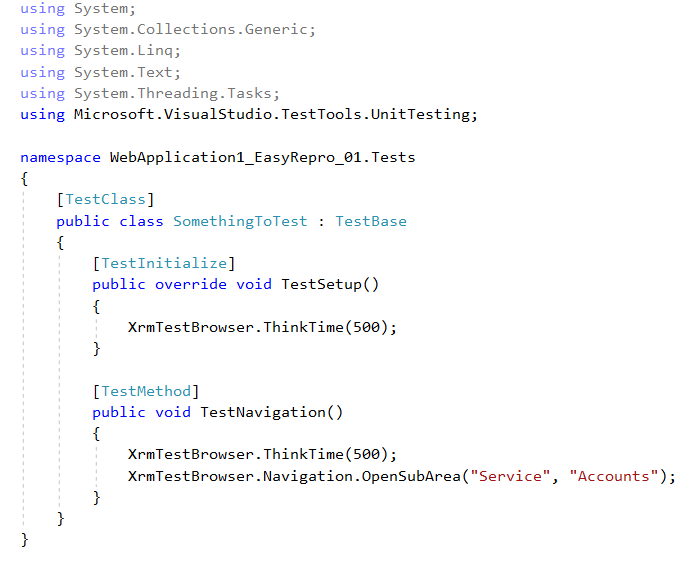
  12. Add a new class to the folder "CRM_A". I will call it SomethingToTest.cs but feel free to choose a name that works for you. Use "Microsoft.VisualStudio.TestTools.UnitTesting", add the [TestClass] decorator.
  13. Make sure to use "public" access modiffier for all test classes you create, other wise will not run.
  14. Implement TestSetup method and one method for each test you want to perform.
  15. Repeat steps 8 to 14 but this time use "_B" instead of "_A".
viernes, 17 de enero de 2020

Dynamics 365 - Install and configure EasyRepro

This entry assumes that you have or at least you created a trial for Dynamics 365 CRM and signed in.
You can create a trial here: https://port.crm.dynamics.com/G/TrialInstances/TrialInstancePicker.aspx

You need to be System Administrator and System Customizer.
http://josevibriezca.blogspot.com/2020/01/promote-to-admin.html
http://josevibriezca.blogspot.com/2020/01/add-system-customizer-role.html

  1. Create a project of type Visual C# / Web / ASP.NET Web Application (.NET Framework)".
  2. Select template MVC for the project.
  3. Check "Add unit tests" checkbox.
  4. Open the App.config file located in the test project.
  5. In configuration / appSettings paste the following keys (replace the values with your own credentials).
    <add key="OnlineUsername" value="name@name.onmicrosoft.com" />
    <add key="OnlinePassword" value="*********" />
    <add key="OnlineCrmUrl" value="https://testcrm.crm.dynamics.com/" />
    <add key="BrowserType" value="Chrome" />
    <add key="RemoteBrowserType" value="Chrome" />
    <add key="RemoteHubServer" value="http://1.1.1.1:4444/wd/hub" />
  6. Right click the test project and select "Manage NuGet Packages...".
  7. Install "Dynamics365.UIAutomation.Api" and "Selenium.Chrome.WebDriver".
  8. Download and add to the project the last version of the class TestBase from https://github.com/microsoft/EasyRepro/blob/develop/Microsoft.Dynamics365.UIAutomation.Sample/Web/Entity/TestBase.cs.
  9. Replace the namespace "namespace Microsoft.Dynamics365.UIAutomation.Sample.Web" with your own namespace, example "WebApplication1_EasyRepro_01.Tests".
  10. Download and add to the project the last version of the class TestSettings from https://github.com/microsoft/EasyRepro/blob/develop/Microsoft.Dynamics365.UIAutomation.Sample/TestSettings.cs.
  11. Replace the namespace "namespace Microsoft.Dynamics365.UIAutomation.Sample" with your own namespace, example "WebApplication1_EasyRepro_01.Tests".
  12. Add a new class to the test project. I will call it SomethingToTest.cs but feel free to choose a name that works for you. Use "Microsoft.VisualStudio.TestTools.UnitTesting", add the [TestClass] decorator.
  13. Make sure to use "public" access modiffier for all test classes you create, other wise will not run.
  14. Implement TestInitialize method and one method for each test you want to perform.

jueves, 16 de enero de 2020

Dynamics 365 - Change Unified interface to Legacy interface

This entry assumes that you have or at least you created a trial for Dynamics 365 CRM and signed in.
You can create a trial here: https://port.crm.dynamics.com/G/TrialInstances/TrialInstancePicker.aspx

  1. Navigate to https://admin.powerplatform.microsoft.com
  2. Click Environments
  3. Select the environment you want to change and click the 3 dots
  4. In the context menu click Settings
  5. Click Products / Behavior
  6. Disable "Use Unified Interface only"
  7. Click Save

Dynamics 365 - Add System Customizer role

This entry assumes that you have or at least you created a trial for Dynamics 365 CRM and signed in.
You can create a trial here: https://port.crm.dynamics.com/G/TrialInstances/TrialInstancePicker.aspx

  1. Click the Gear located in the top right corner
  2. Click Advanced Settings
  3. Click Settings and then Security
  4. Click Users
  5. Select the desired user and click Manage Roles
  6. Select System Customizer

Dynamics 365 - Promote to Admin

This entry assumes that you have or at least you created a trial for Dynamics 365 CRM and signed in.
You can create a trial here: https://port.crm.dynamics.com/G/TrialInstances/TrialInstancePicker.aspx

  1. Click the Gear located in the top right corner
  2. Click Advanced Settings
  3. Click Settings and then Security
  4. Click Users
  5. Select the desired user and click Promote To Admin
  6. Click OK

lunes, 3 de julio de 2017

Editar el archivo hosts en Android con Android Studio (detallado)

  • Ejecutar con una consola el emulador con permisos de escritura en /system, para ello ejecutar los siguientes comandos. Nota: la imagen de Nexus (Google Play) no funciono a la hora de hacer remount pero la imagen de Pixel (sin Google Play si funciono).
    Ejemplos:
    C:\Users\NombrePC\AppData\Local\Android\sdk\tools
    emulator -list-avds
    emulator.exe -avd [emulator_name] -writable-system
    emulator.exe -avd Nexus_5X_API_24 -writable-system
    emulator.exe -avd Pixel_API_25_--_2 -writable-system

  • Ejecutar en una segunda consola
    adb root
    adb remount

  • En Android Studio > Tools > Android > Android Device Monitor > File Explorer > /system/etc /hosts descargar el archivo con el botón Pull, editarlo y subirlo con el botón Push
  • Para editar el archivo hosts usar Notepad++, dejar una línea al final y seleccionar Editar/Conversión fin de línea/Convertir a formato UNIX de lo contrario el archivo hosts será ignorado (recomendación en stackoverflow)
  • Si se utiliza la app de Chrome para probar el archivo hosts, seleccionar …/ Reducir datos / Desactivar (recomendación en stackoverflow)
https://www.howtogeek.com/140576/how-to-edit-the-hosts-file-on-android-and-block-web-sites/

https://end0tknr.wordpress.com/2015/07/19/edit-hosts-file-via-android-device-monitor-in-android-studio-and-adb-shell/

https://infosectrek.wordpress.com/2017/03/06/rooting-the-android-emulator/

https://android.stackexchange.com/questions/171442/root-android-virtual-device-with-android-7-1-1/176400#176400